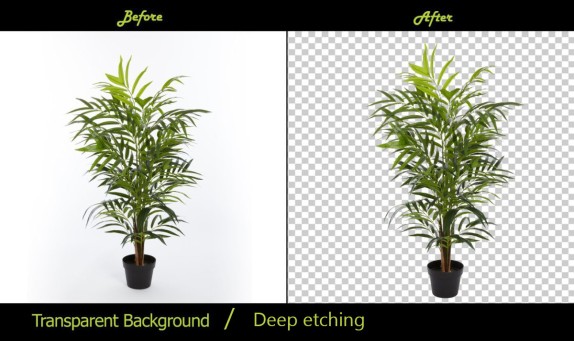
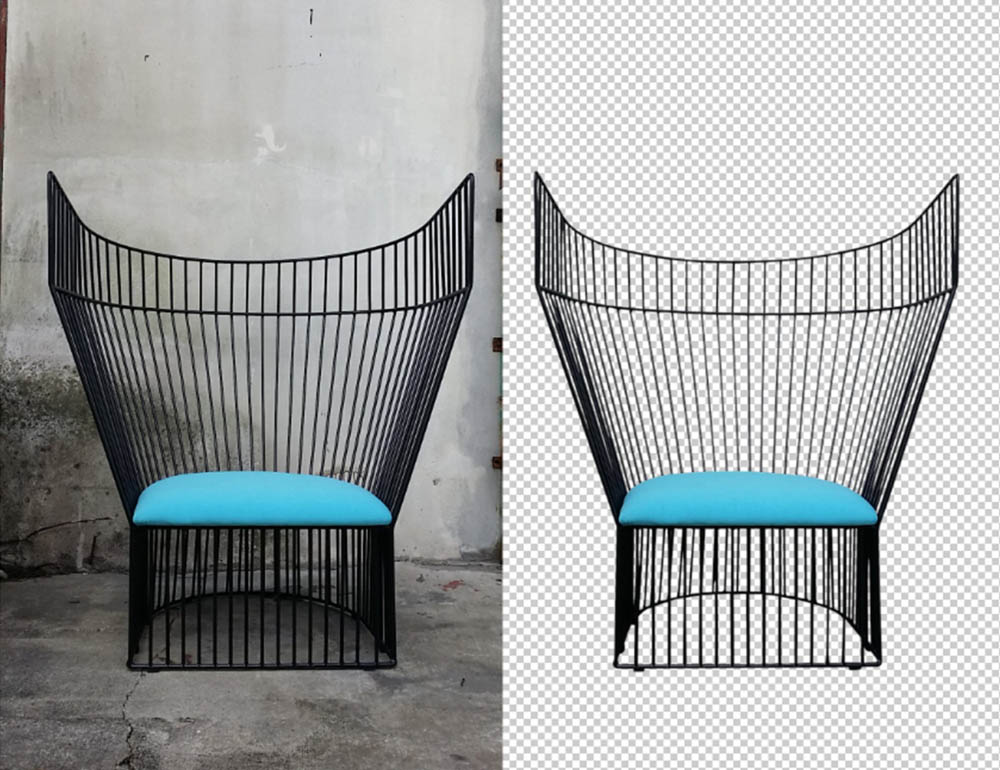
Using Photoshop to remove the background from your product images and replace it with a transparent one gives you a wide variety of display options, all of which have the potential to make your products look more appealing to the eye.
If you have a background that is transparent, you will be able to place your product against a background that dynamically changes colors, which will make it look more appealing. In addition, a product with a transparent background can interact with its surroundings in a variety of different ways on websites that are designed to respond appropriately to a variety of screen sizes.
It is crucial to give website logos a transparent background when designing them to ensure they can be placed on any page without being negatively affected by the background color. Therefore, it is essential to know how to make an image transparent background in Photoshop.
Understanding the Concept of Transparent PNG Backgrounds
A transparent PNG is an image file type that allows for a white or transparent background. Most pixels in an image are often filled with color, even if that color is white. On the other hand, a transparent background reveals what lies behind it because it has no background pixels.
Make sure your logo looks amazing on every page of your website, whether for your freelance employment, small business, or organization. By giving your logo a transparent background, you can ensure that it will look polished and expert whether it is displayed on your site, a third-party site, a social media platform, or anywhere else.
Unless you're planning on switching up the color scheme of your site, a PNG with a transparent background is necessary for seamless integration.
Adobe Photoshop is the most popular and extensively used tool for editing transparent PNGs and is regarded as the industry standard for photo editing. However, other tools such as Canva and Fiverr are also available. This exhaustive guide explains how to make an image transparent background in Photoshop.

How to Make an Image Transparent Background in Photoshop Step by Step
After you have gained the necessary knowledge, utilizing Photoshop to generate a background that is transparent and saving the file in a format that is suitable for uploading to the web is a straightforward process. You will be led through this process by the steps that are listed below.
1. Convert your image into a layered file in Photoshop.
2. Create a selection of the part of the image that you want to keep.
3. Delete the background from the image.
4. Save the resulting image in a web-ready format that is appropriate for your needs.
5. Save the file to preserve the changes you have made to the image.
Step 1: Convert Your Image into a Layered File in Photoshop
In order to create a product image with a transparent background in Photoshop, you must first launch the application and open the image file, which is most likely saved in the JPG file format.
Find the Layers panel, which is typically located on the right side of the image window but can also be accessed by clicking on the "Window" menu item and then selecting "Layers" from the dropdown menu that appears.
When you double-click the Background layer in the Layers panel, a New Layer dialogue box will appear, asking you to rename the layer. If you want to change the name of the layer, you can change it in the dialogue box. You are free to keep the default name of "Layer 0" and proceed to click the OK button.
Your background layer will become unlocked after you take this action, and any content removed from it will result in transparency.
Step 2: Create a Selection of the Part of the Image That You Want to Keep
In Photoshop, select the Magic Wand tool from the Toolbar located on the left-hand side of the application window. This will allow you to create a background that is transparent.
After that, under the options bar at the top of the screen, select "Pick Subject" by clicking on it. This will cause Photoshop to attempt to select the object in the shot, regardless of what the background looks like. The selection will appear to you as a "super tiny pearl chain" surrounding the region that you have selected.
In the event that the selection is not accurate, you can use the Magic Wand tool to either take away more of the backdrop from the selection or add more of the product to the selection, depending on how the selection is currently constructed.
For example, if Photoshop is unable to remove the part that you want from the selection, you can choose the "Subtract from selection" icon from the Options bar and then use the Magic Wand tool to click on the parts that need to be removed until the selection only contains the cutout that you want. This works even if Photoshop is unable to remove the part that you want from the selection.
Make sure that any portions of the image that contain "holes" or "connecting points" are selected before you create a selection for your product image in Photoshop in order to produce a background that is translucent. This is vital because it will ensure that these regions continue to be transparent and that they are carved out from the background in the appropriate manner.
Step 3: Delete the Background from the Image
After you have chosen your product image, select the inverse by either pressing SHIFT+CTRL+I (or SHIFT+COMMAND+I on a Mac), or by selecting "Select > Inverse" from the dropdown menu that is located at the very top of the application window.
Once you have the inverse (background) selected, you can make the background translucent by pressing the BACKSPACE key (or the DELETE key on a Mac). A checkerboard pattern in grey and white indicates a transparent background in Photoshop. This pattern is used to depict a transparent background.
Finally, press the CTRL and D keys on your keyboard (or the COMMAND and D keys on a Mac) to deselect the current selection.
Step 4: Save the Resulting Image in a Web-Ready Format That Is Appropriate For Your Needs
It is not sufficient to merely create a background that is transparent in Photoshop; you must also save your product image in the appropriate format in order to guarantee that it will display with transparency on your e-commerce website.
PNG-24 is the file format that is most suited for this objective since it supports several levels of transparency and prevents the formation of a pixelated "halo" effect when put on a backdrop color of a different hue than the foreground color. It is conceivable for other formats, such as PNG-8 and GIF, to produce this halo effect; hence, it is recommended that PNG-24 be used wherever it is feasible.
There are a few different procedures that must be taken, depending on the version of Photoshop that you are using, in order to save your file as a PNG-24.
If you are using Photoshop CC, you have the option of either pressing the shortcut SHIFT+ALT+CTRL+W (or SHIFT+OPTION+COMMAND+W on a Mac) or going to the top menu and selecting File > Export > Export As...
However, if you are using an older version of Photoshop and the Export As... option is not available to you, you can use the Save for Web feature and choose PNG-24 from the Preset dropdown menu that is located on the right side of the dialogue box. This will save the image in a format that is suitable for the web.
Choose the PNG format and enable transparency in the dialogue box that appears after you export or save the file by checking the appropriate boxes in the File Settings section on the right. Do not select the Smaller File (8-bit) option, as doing so will cause your file to be converted to PNG-8 format.
The estimated size of the PNG file that corresponds to your image is shown on the left-hand side of the dialogue box. It is essential to keep an eye on this size because webpage loading times can be slowed down by higher file sizes. It is recommended that photos used on websites have a file size of less than 200 KB.
You can change the proportions of your image under the Image Size section of the dialogue box, which is located on the right side of the box. As the dimensions are decreased, the resulting file size will also be decreased. On the other hand, you shouldn't make the proportions too small or the picture will look pixelated or blurry when it's shown on your website.
It is advised that you save your product image in a size that is between 50 and 100 percent larger than the size you want it to display on the screen. This will ensure that the image appears sharp on all platforms, which is especially important for clients who are using a retina display.
To prevent prolonged load times, you will need to strike a balance between the size of the image and the size of the file. Save only your highlighted product images at a bigger size for retina devices, and save the rest of your product images at their original size to keep the file size as little as possible. It is essential to keep the size of the web image at or below 200 KB in order to prevent the loading time of your web page from being slowed down.
Step 5: Save the File to Preserve the Changes You Have Made To the Image
Click the ‘Export All’ button once you have ensured that the image's proportions are accurate. On the Save window, select the folder where you want to save the web-optimized versions of the photographs that you just created.
It is best practice to make them distinct from your original photographs so that there is no room for misunderstanding when submitting content to your website. Your picture file should have a name, and you should make sure that its extension is in the.png format.
In the end, select the Save button to store the image after it has been optimized.
With the information you've learned, you should be able to make web-friendly images with transparent backgrounds that look good without slowing down the speed at which your website loads.
Alternative Tools for Creating Transparent Backgrounds for Your Images
There are several tools and pieces of software that may be used to produce an image with a translucent background for your company logo. While utilizing mobile editing tools, it is essential to be aware of the file size and make certain that the quality of your logo is maintained at a high level in order for it to be published on desktop websites.
Adobe Photoshop, which offers both a free trial and pay-as-you-go subscriptions, is widely regarded as the standard in the industry.
Canva is a free and easy web-based editing software. It's an excellent web browser-based tool for creating transparent backdrops.
Snappa is a free web programme that can be used to make graphics for things like social networking postings, blog photos, and ads.
Desktop software such as Lumina and InPixio use AI and classic picture editing techniques, respectively, to automatically remove objects from photos and alter the color of the sky. Lumina and InPixio both offer these features.
Background eraser: superimpose is a mobile software that is available for iOS users that makes it simple to remove backgrounds from images and save the results as PNG files.
Users of Google Play or Android have access to a comparable software called Ultimate Background Eraser.
Your photographs can have a transparent background created using any one of a number of different techniques thanks to the wide range of tools and software options available to you.
Final Words
To conclude, making a transparent background in Photoshop is easy and can greatly improve your photographs. The Magic Wand, Quick Selection, layer masks, and rubber tool may remove the background from your image and export it as a transparent PNG. These tools let you modify your selection and image edges to match the background.
While you edit, save often. This protects your progress from power interruptions and system crashes. Experimenting can also help you reach your goal and improve your design or picture editing skills.
Learn how to make an image transparent background in Photoshop to generate attractive photographs for any website or design project. Translucent backgrounds add versatility and professionalism to your designs. With the option to customize transparency, you may create numerous effects and styles to enhance your photographs.
Post a Comment