
Learn how to set up a multi-user network on your QuickBooks desktop so you can access your company files:
As per the users and their feedbacks, QuickBooks is regarded to be one of the finest accounting software till date. It is highly productive and lets you to manage all the accounting activities in the smoothest possible way. It comes with countless features, one of which is multi-user mode, which not only intensifies the productivity and also QuickBooks experience. It lets multiple users to access and manage the same file at the same time that too in the same network. If you are interested in knowing how to set up multi-user network in QuickBooks desktop, then make sure to read this article ahead.
Moreover, you may also reach out to our accounting professionals and let them know your queries to set up multi user network in QuickBooks desktop. Consult our professionals by means of our support line i.e. 1-800-761-1787, and our QuickBooks desktop support team will be there as your assistance.
You might also like: Fix QuickBooks is Unable to Send Emails due to Network Connection Failure Error
What is multi-user network in QuickBooks desktop?
Before you learn the process to set up multi-user network in QuickBooks desktop, it is important to understand, what it is actually. Multi-user mode allows more than one person to work on a single company file at the same time. This feature saves a lot of time and makes things quick and easy. If you are having a huge firm having a large number of employees, then multi-user mode can be really beneficial for you. However, it should be noted that in order to set-up multi-user network in QuickBooks, you need to own a separate licensed copy of QuickBooks installed in the system.
Basic requirements to set up multi user network
- It is advisable to installed up users for the company file before switching to multi-user network.
- Examine the windows file permissions by logging in as an admin.
- Another important thing is to verify the QuickBooks database server manager, and turn it on.
Quick facts to setup multi-user network
QuickBooks allows you to have accesses to the data file all over the network. However, each user will have to install the software separately. Different accounts are provided different access like:
- QuickBooks enterprise solution is permitted a height of 30 users to access the file together.
- The limit is a maximum of 5 users in QuickBooks Premier.
- While as the number even lowers down to maximum of 3 in QuickBooks Pro.
Read Also: How to Fix Locked File Errors in QuickBooks Desktop?
Steps to setup multi-user network in QuickBooks desktop
The below stated are the steps that can be followed by a QuickBooks user to setup multi-user network in QuickBooks.
Step 1: Downloading and installing QuickBooks desktop
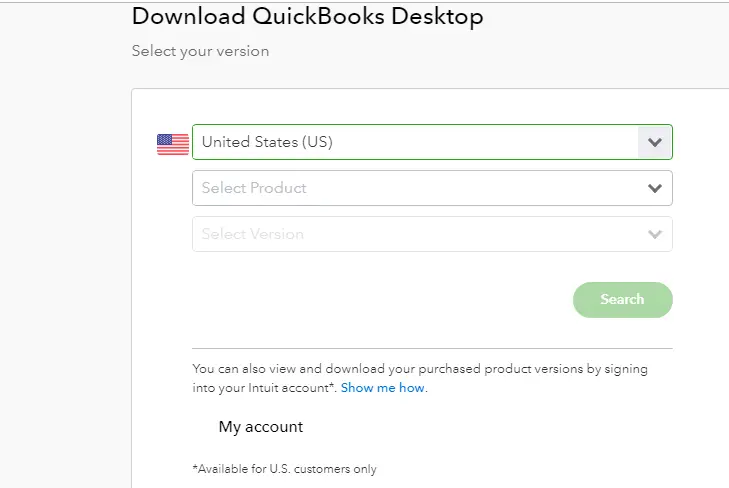
- The initial step is download QuickBooks and then save the file.
- Followed by installing the software by carrying out the respective steps.
- Select Custom and network install for the install type.
- And then, choose I’ll be using QuickBooks desktop on this computer, AND I’ll be storing…in case you want the full version of QuickBooks desktop on the server system. Or in case you want the server system to the host files, then another option should be opted.
- Followed by carrying out the onscreen steps and complete the installation.
- Also, don’t forget to select the multi-user host installation.
Step 2: Switching to multi-user hosting
- You are required to open the QuickBooks software.
- And then update the QuickBooks company file to the newer version if needed.
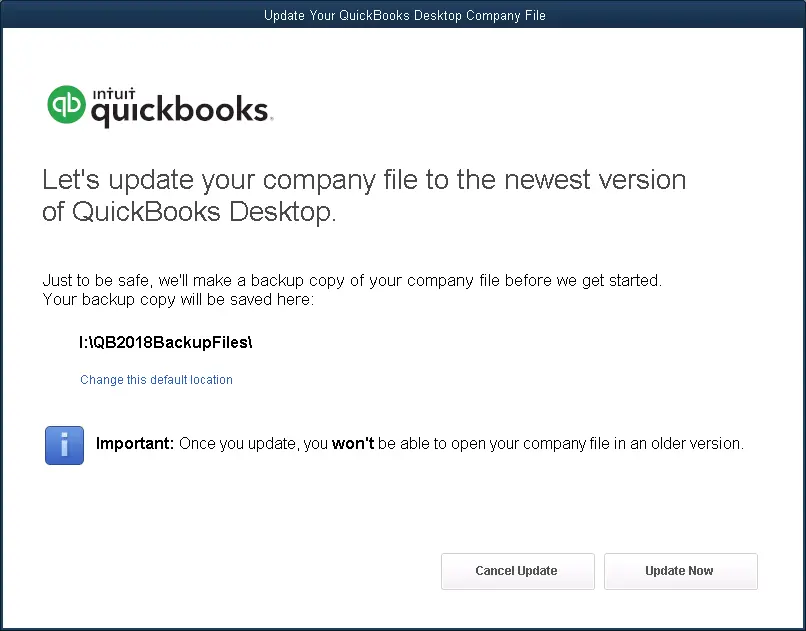
- Next step is to move to the file and hit a click on utilities option, along with clicking on the host multi-user access.
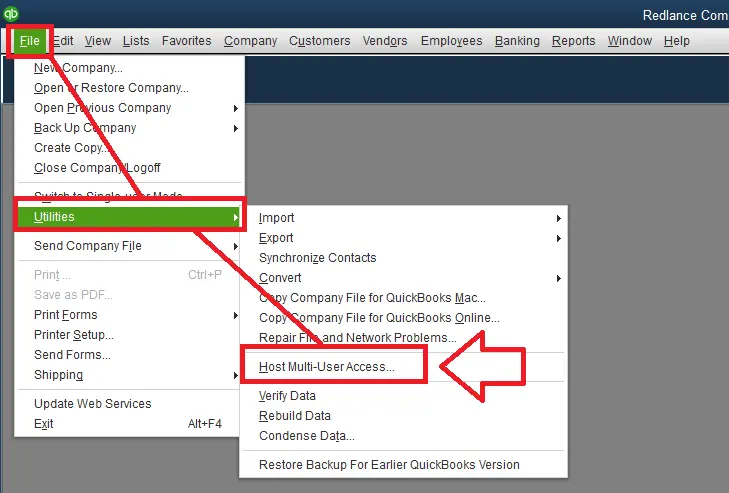
- Also if the previously hosted multi-user set up is present, then you are recommended to move to the next step.
Step 3: Configure the firewall and security settings for desktop
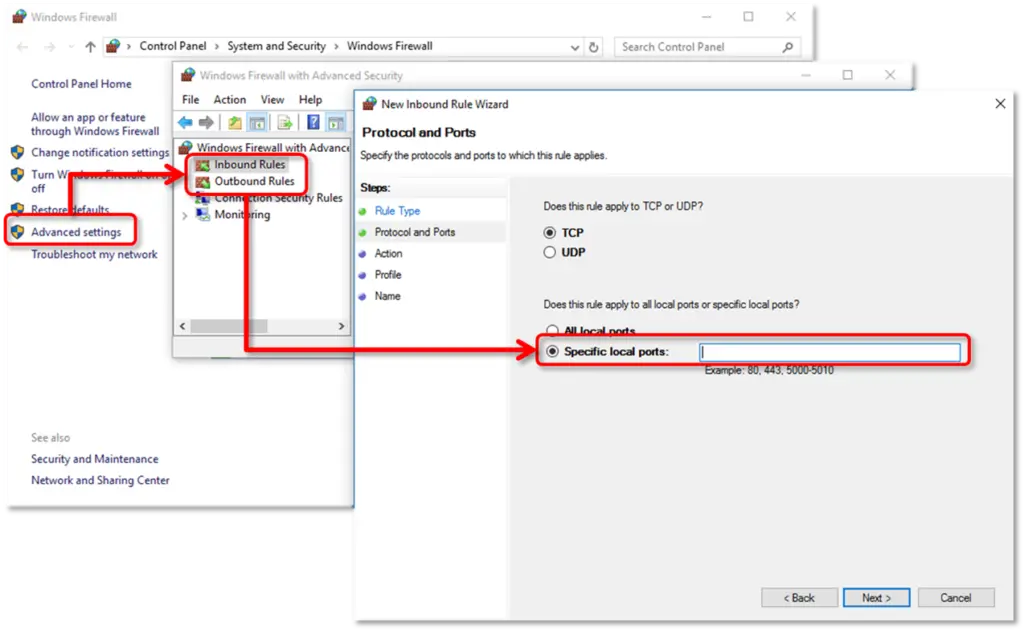
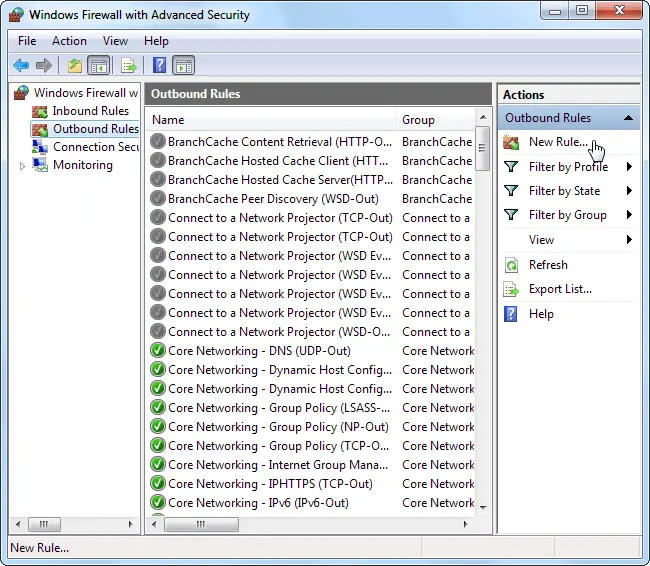
- Open start menu and then check the firewall.
- And then opt for Windows firewall and also hit a click on the advanced settings option.
- Next step is to click on the inbound rules and then choose the new rule option.
- Next, click on Port, followed by selecting Next .
- After that check out the TCP option and then type in the ports that are needed for QuickBooks year version.
- Select the allow the connection option.
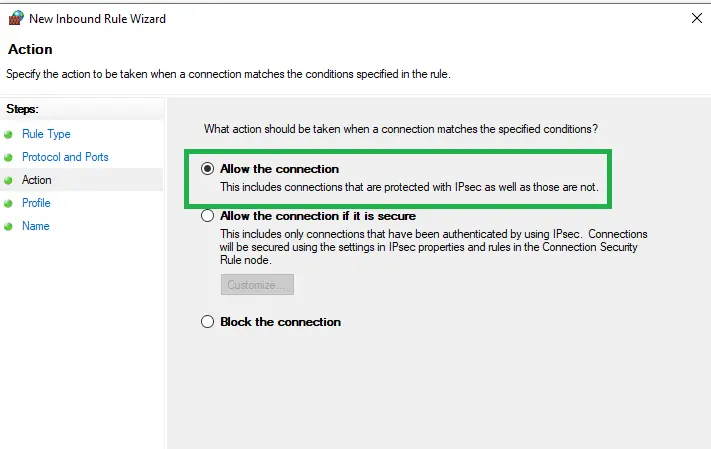
- And then check-mark all the profiles and then switch to the other step by selecting the next option.
- Assign a name to the rule and then click on finish option.
- And end the step with opening QuickBooks in multi-user mode.
Step 4: Move on to the folder and windows access permissions to share company files
- Now users are supposed to right click the folder having the company file.
- And then move to the properties option and select the security option. Also click on the edit option.
- Along with that, users needs to select QBDataServicesUserXX and then select Full control option and click on allow option.
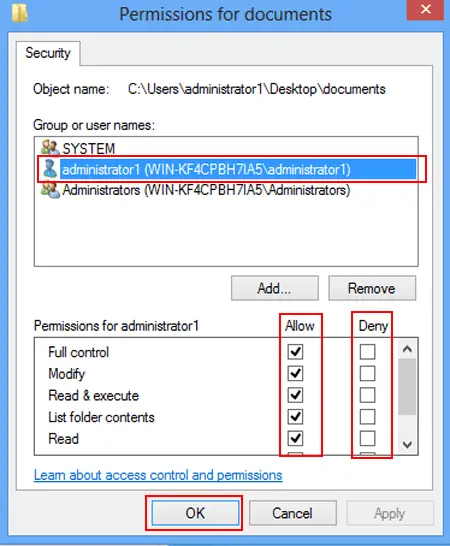
- Next step is to click on apply tab and then click on OK.
- End this step by setting up windows access permissions to share company files.
On Windows 10, 8, 7
- Tap on the Win + R keys together to open the file Explorer tab.
- After that search and right click the folder having the company files.
- Next step is to tap on properties and sharing options, followed by clicking on share ad option respectively.
- Now select the corresponding QBSataServiceUserXX, XX here is particular version of QuickBooks.
- Finally, select full control option and select the Share option.
See Also: What is QuickBooks desktop enterprise system requirements?
Step 5: Check the file and set up the QuickBooks database server manager
- The initial step is to click the start tab and then the programs and QuickBooks option respectively.
- And then tap on QuickBooks database server manager.
- After that choose the scan folders tab.
- And tap on the add folder option.

- Now select the folder having the company file and hit OK, also select the add folder option.
- Click on the scan tab and start with the scanning process.
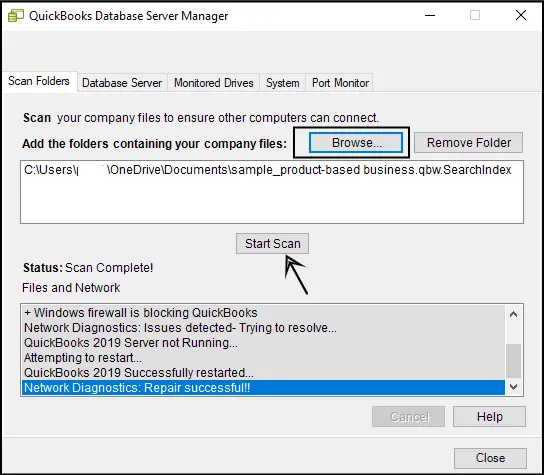
- End the process by hitting on the close option.
Step 6: Inserting Windows Admin rights to permit configuration to multi-user access
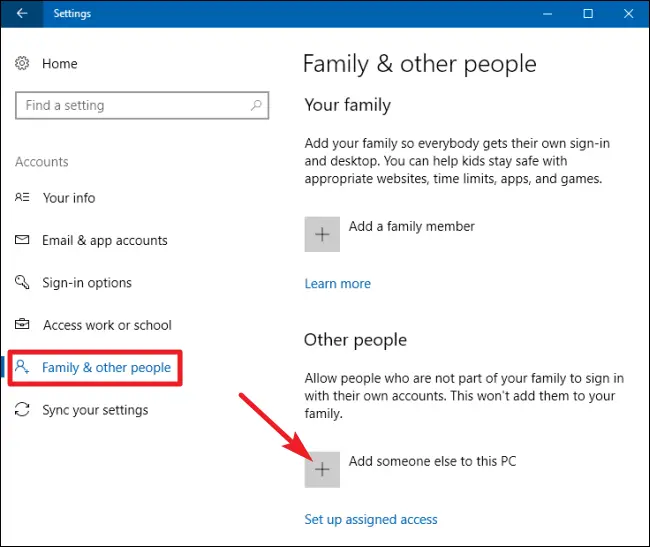
On Windows 10:
- Click on the start tab and then click on settings > accounts > family & other users respectively.
- And then select the add someone else on this computer option.
- Next step is to pick the I don’t have this person’s sign-in information option and also insert a user without Microsoft account.
- After that, assign a new name and password to the account.
- Followed by clicking the finish option.
- And then, provide the admin authorities to the new user.
- Once done with that, select the newly created account and then select the account type.
- Now select the admin tab from the drop -down list.
- And lastly hit OK and save option respectively.
Windows 8 and 7:
- Press the Ctrl + R keys and then open the Control panel.
- Select user accounts > manage another account > create a new account respectively.
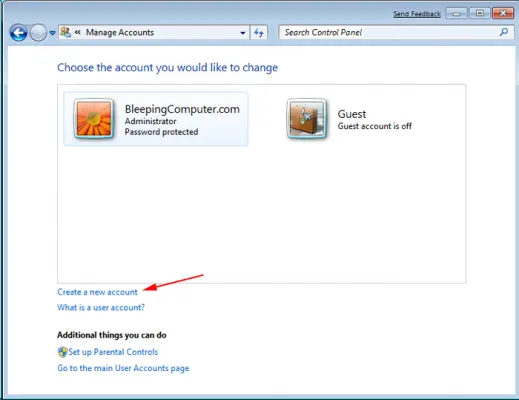
- And then, type in the user name and select the admin tab and also click the create option.
You may also see: Fixing QuickBooks keeps crashing/freezing error
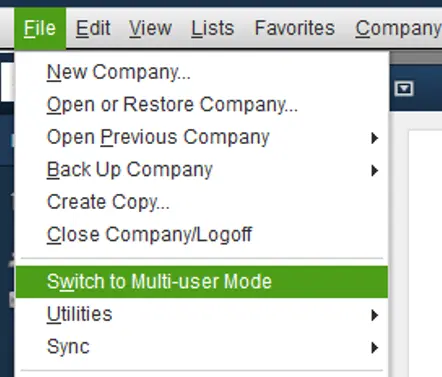
Step 7: Start with a company file located on a remote computer
- Initially, you need to visit the QuickBooks file menu and then select switch to multi-user mode.
- And then select Yes option in the multi-user setup hosting window.
- Next step is to click on OK in the multi-user setup information window.
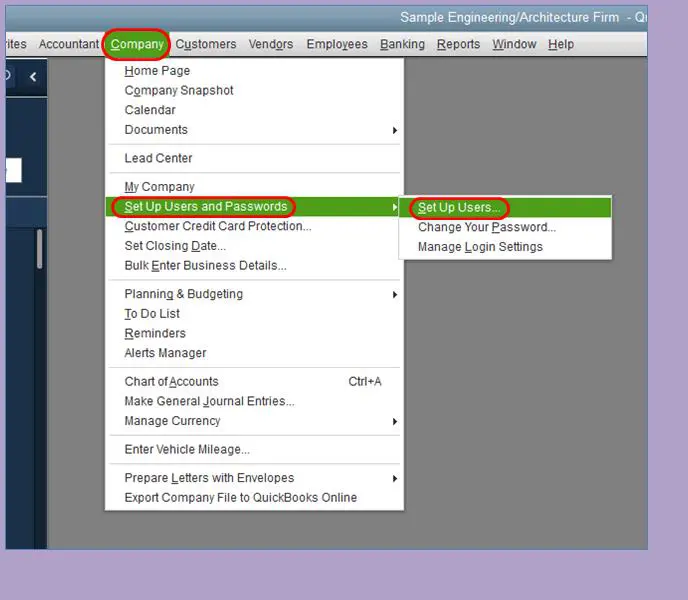
- And end the process by adding expected users by visiting the company > set up users and passwords > set up users > add user respectively, and you are good to go.
Winding up!
Multi-user mode can be highly beneficial in making this smoother and efficient. In a nutshell, setting up QuickBooks multi-user network in QuickBooks becomes a necessity, especially if you are huge firm. We end the post here with the hope that the above stated information might help you in setting up multi-user mode with much ease.
However, in case of any query or if you are facing any sort of issue, then make sure to contact our QuickBooks enterprise technical support at 1-800-761-1787, and our experts will be there to assist you in a single call. Get in touch with our support team today!!
QuickBooks Multi-use network – FAQs
The system requirements to set up a multi-user network in QuickBooks profoundly depend on the QuickBooks version set up on the system. Users should have a dedicated server PC and a network adapter.
Yes! You can set up a multi-user network without a server computer. It is possible by the use of a peer-to-peer network.
The number of users that can access QuickBooks Desktop in multi-user mode depends on the QuickBooks version. Notably, QuickBooks Pro and Premier versions of the accounting program can support up to a maximum of 3 users, while QuickBooks Enterprise can support 30 users.
Similar Articles:
How to Export data file from QuickBooks Online to QuickBooks for Mac?
