How to set a pixel for a short link?
In Cuttly you can set a pixel to a short link (this feature is dependent on an active subscription plan). Note that adding a pixel changes the redirect type from 301 redirect to HTML meta refresh redirect. The redirect from 301 to HTML meta refresh changes automatically so that the pixel can load when redirecting a short link.
Before using pixels: If you are distributing links to audiences in the EU or other regions with cookie consent requirements, make sure you have set up your **Privacy Policy URL** and enabled **Pixel Cookie Consent** in your account settings. Go to Account Settings → Pixel settings to configure these options. See the [GDPR & Cookie Consent section](#gdpr-cookie-consent) below for details.
To set a pixel:
1. Log in to your Cuttly account.
2. Go to the list of short links in your dashboard.
3. Click the pixel settings button.

4. The pixel settings form will open.
5. If you have created your saved pixel list, you can select a pixel from the list and then click the "Add +" button.
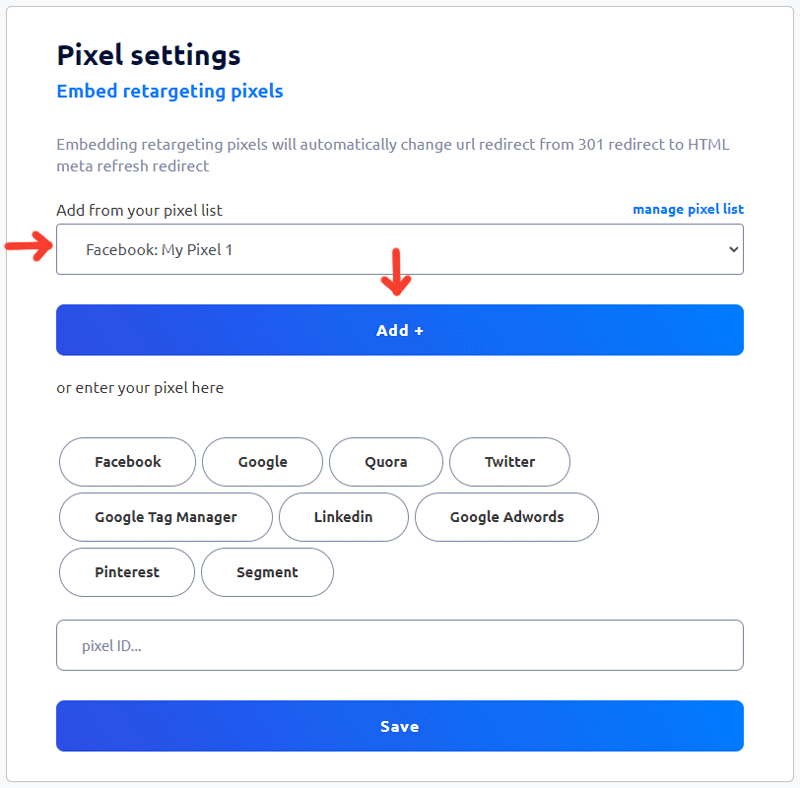
6. You can also add a new pixel without using the pixel list. In the second part of the form, select the website / portal from which you want to add a pixel, and then enter the appropriate pixel ID, which you can download from the website / portal from which you add the pixel. After entering the pixel data, press the button to save changes.

7. After the pixel has been correctly added, it will be visible at the bottom. You can delete it at any time.

GDPR & Cookie Consent for Pixels
Retargeting pixels set third-party cookies on visitor devices. Under GDPR and ePrivacy regulations, setting such cookies requires appropriate consent from visitors — particularly those based in the EU. **It is your responsibility** as the link creator to ensure compliance.
Cuttly provides two settings in **Account Settings → Pixel settings** to help you meet these requirements:
Your Privacy Policy
Enter the URL of your organisation's privacy policy. This is required before cookie consent can be shown to visitors on pixel-enabled links. The privacy policy URL is displayed to visitors as part of the consent mechanism.
How to set it:
1. Go to Account Settings
2. Scroll to Pixel settings
3. Click Your Privacy Policy
4. Enter your Privacy Policy URL
5. Click Save
Pixel Cookie Consent
A global toggle that applies to all pixel-enabled links in your account. When enabled, all links using pixels will require cookie consent from visitors before any pixel fires.
How to set it:
1. Go to Account Settings
2. Scroll to Pixel settings
3. Click Pixel Cookie Consent
4. Check the Pixel Cookie Consent checkbox
5. Click Save
Use the Clear button to reset all manually configured consent settings if needed.
Main account and Team workspaces
Both settings — Your Privacy Policy and Pixel Cookie Consent — are configured separately for:
- Your main Cuttly account
- Each team workspace you own or manage
Each team can have its own privacy policy URL and cookie consent configuration, independent of the main account and other teams.
Your responsibility
Cuttly provides the technical mechanism for cookie consent on pixel-enabled links. It is your organisation's responsibility to ensure that:
- Your privacy policy is accurate and up to date
- The consent mechanism meets the requirements applicable to your audience and jurisdiction (GDPR, ePrivacy, and others)
- Your overall use of retargeting pixels complies with applicable data protection regulations
If you are unsure whether your implementation is compliant, consult your Data Protection Officer or legal counsel.
Find out more about the options available in your subscription plan here: Cuttly pricing and features
-
How to create short link with Cuttly?
How to copy short link with Cuttly?
How to change short link alias (name) with Cuttly?
How to set UTM parameters with Cuttly?
How to set a password to open short link with Cuttly?
How to add alternative redirects for mobile links with Cuttly?
How to change the source URL in a short link?
How to set up link analytics counting by unique clicks?
How to change the link title displayed in the dashboard?
How to set link redirect expiration?
How to set a pixel for a short link?
Link rotation - how to set A/B/C test for a short link?
How to generate the QR code for short link?
How to remove short link?
How to share a short link on social media?