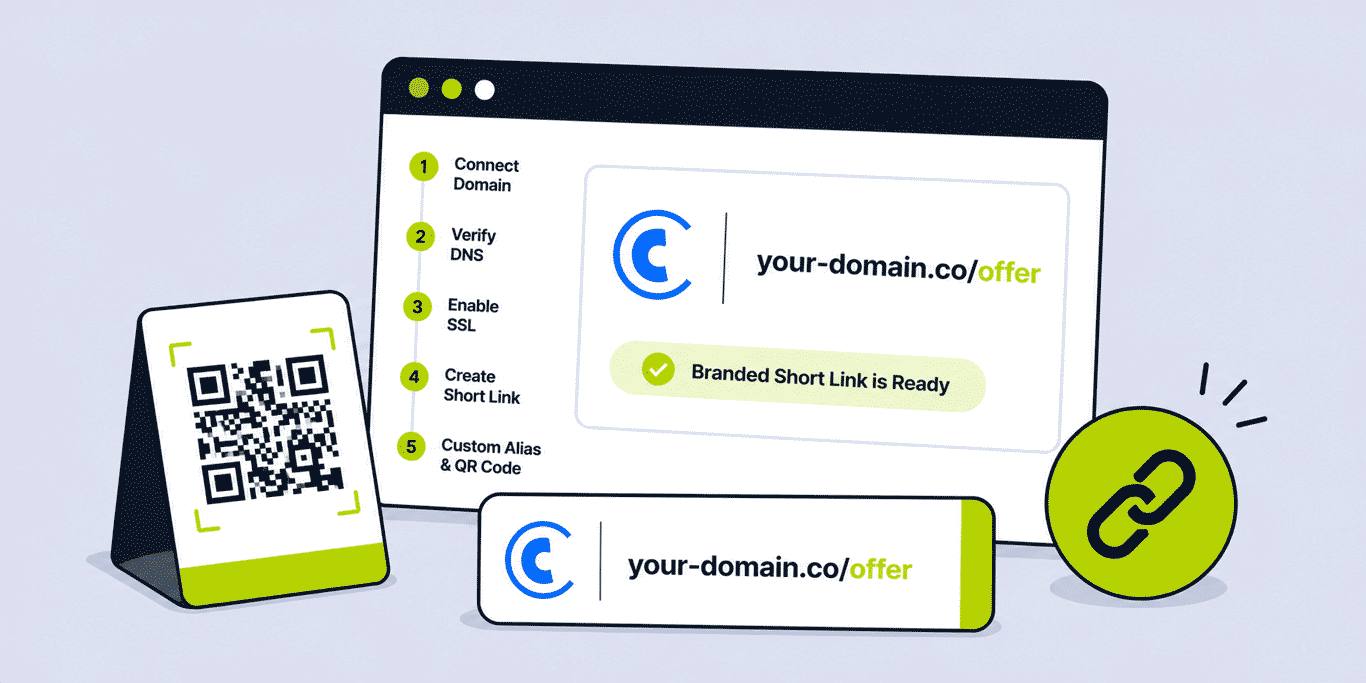
How to Create a Branded Short Link: Step-by-Step Setup Guide
A branded short link uses your own domain — go.yourbrand.com/campaign — rather than a URL shortening platform's domain. The difference is visible in every link you share and measurable in the trust your audience places in those links. Setting up a branded short link infrastructure in Cuttly takes under 30 minutes of active configuration time, requires no developer or technical expertise beyond basic familiarity with DNS records, and costs less than most marketing activities that benefit from it. This guide covers the entire setup process from the beginning: deciding which domain to use, registering a domain if needed, adding the domain in Cuttly, configuring the DNS records at your provider, waiting for and verifying domain approval, setting up SSL, creating your first short link with a custom alias, generating a QR Code, configuring root and 404 redirects, and troubleshooting every common setup issue. By the end, your branded short link infrastructure will be live and your first short link will be ready to share.
What This Guide Covers
- Deciding which domain to use — subdomain vs dedicated short domain vs apex domain
- Domain options: what makes a good short domain
- Registering a dedicated short domain if needed
- Step 1: Create your Cuttly account
- Step 2: Add your domain in Cuttly
- Step 3: Configure the DNS A record
- Step 4: Configure the DNS TXT record
- Step 5: Wait for and confirm domain verification
- Step 6: Set up SSL
- Step 7: Configure root and 404 redirects
- Step 8: Create your first branded short link
- Step 9: Set a custom alias
- Step 10: Add UTM parameters
- Step 11: Generate and customise a QR Code
- Troubleshooting: domain not verifying, SSL issues, common errors
- Managing multiple branded domains
- What comes after setup: naming conventions and link organisation
Deciding Which Domain to Use
Before adding a domain to Cuttly, decide which domain your branded short links will use. There are three practical options, each with different implications for branding, cost, and setup complexity.
Option A: A Subdomain of Your Existing Domain (Recommended Starting Point)
A subdomain of a domain you already own is the simplest and lowest-cost option. Examples: go.yourdomain.com, links.yourdomain.com, l.yourdomain.com. The prefix before the first dot is the subdomain; everything after it is the domain you already own. This approach leverages your existing domain's brand recognition, requires no new domain registration, and shares the trust authority of your established domain.
Important constraint: do not use your website's root domain (yourdomain.com itself) as a branded short link domain if your website is hosted there. Pointing the root domain's DNS A record to Cuttly would redirect all traffic away from your website. Use a subdomain (go.yourdomain.com) — DNS A records for subdomains only affect that specific subdomain, not the root domain or any other subdomains.
Subdomain choice: common conventions are go., links., l., link.. There is no technical difference between these — choose based on what looks most professional and readable in the context of your short links. go.yourbrand.com/campaign is clean and action-oriented; l.yourbrand.com/campaign is minimal; links.yourbrand.com/campaign is descriptive.
Option B: A Dedicated Short Domain
A dedicated short domain — registered specifically for branded short links — produces the most compact and memorable branded short links. Example: if your main domain is northgatedesignstudio.com, a branded subdomain URL would be go.northgatedesignstudio.com/alias — long. A dedicated short domain like ngds.link produces ngds.link/alias — significantly shorter and more practical for print materials, business cards, and any context where link length matters.
A dedicated short domain also allows you to use the root (apex) domain for branded short links — ngds.link/alias rather than go.ngds.link/alias. Cuttly's DNS configuration using A records (not CNAME) enables apex domain branded short links, which is not possible with CNAME-only configurations.
Short domain registration cost: $10 to $20 per year from any domain registrar (GoDaddy, Namecheap, Google Domains, Porkbun, Cloudflare Registrar). Popular TLDs for branded short domains: .link (semantically appropriate, often available in short combinations), .io (popular in technology and startup contexts), .co (concise, broadly recognised), country-code TLDs (.ly, .gg, .vc). Choose based on your brand's context — .io suits technology products; .link suits marketing and general business use.
Option C: Apex Domain of Your Existing Domain
If your main website domain is already short (5 to 8 characters, like acme.co), you might want to use the root domain for branded short links. This is only viable if the root domain is not used for a website — i.e., if the website is hosted on a subdomain (www.acme.co) rather than the root (acme.co). Verify this before proceeding: if your website is hosted at https://acme.co (without www), pointing the root's DNS A record to Cuttly will break your website.
What Makes a Good Short Domain
If registering a dedicated short domain, these criteria produce the best branded short links:
- Short: 3 to 8 characters before the TLD. The entire branded short link (domain + alias) should be comfortably typeable in 15 to 25 characters for any link that appears in print.
- Memorable: an acronym or abbreviation of your full brand name, a distinctive short word associated with your brand, or a combination of initials.
- Available: check availability across multiple registrars. Short domain combinations in popular TLDs are often already registered — broaden the TLD search if your first choice is taken.
- Professional: avoid hyphens, numbers, and uncommon TLDs that may look suspicious or be difficult to type.
your-brand.lklooks less professional thanyourbr.link. - Not confusable with an existing brand: check that the short domain does not abbreviate to something associated with another brand or organisation in your market.
Step 1: Create Your Cuttly Account
Go to cutt.ly/register. Registration requires an email address and password. No credit card is required for the free plan. Registration completes in under 2 minutes. The free plan includes 1 branded domain, 30 links/month, basic QR Code generation, UTM builder, and 30 days of analytics.
If you plan to use SSL auto-provisioning (recommended) and need more than 30 links/month, the Single plan ($25/month) is the most appropriate starting point — it includes Let's Encrypt SSL (automatic HTTPS for your branded domain), up to 5 branded domains, 5,000 links/month, and 1 year of analytics history. You can start on the free plan and upgrade after completing the setup and confirming the configuration works.
Step 2: Add Your Domain in Cuttly
After logging in, navigate to the Branded Domains section. Access it via: the left sidebar (Link Management → Branded Domains), the "Add new domain" option in the link shortening interface, or Edit Account (upper right corner or left sidebar) → scroll to the custom domains section.
Click Add new domain. A side panel opens. Enter your domain or subdomain:
- For a subdomain: enter
go.yourdomain.com(the full subdomain including the prefix) - For a dedicated short domain at root: enter
yourshortdomain.link - For a dedicated short domain with a subdomain prefix: enter
go.yourshortdomain.link
After entering the domain, Cuttly displays two DNS record values specific to this domain:
- The DNS A record IP address — the IP address to point your domain to
- The DNS TXT record verification string — starting with
cuttly-verification-site-followed by a unique string
Do not close this panel yet. Copy both values somewhere accessible (a notes file or screenshot) — you will need them in the next step at your DNS provider. Then select your SSL preference (see Step 6 for SSL options detail) and click Add new domain to confirm. The domain will appear in your domains list with status in verification.
Step 3: Configure the DNS A Record
Log in to your domain registrar or DNS provider — wherever your domain's DNS settings are managed. Common providers: GoDaddy, Namecheap, Cloudflare, Google Domains, Porkbun, 123-reg, One.com, Squarespace Domains, and any web hosting provider that includes DNS management.
Navigate to the DNS management section for your domain. Look for "DNS Records," "DNS Settings," "Zone Editor," or "Advanced DNS" — the exact label varies by provider. Find the option to add a new DNS record.
Add the following A record:
- Type: A
- Name / Host: the subdomain prefix only, or
@for the root domain. If configuringgo.yourdomain.com, entergoin the Name field (not the full domain). If configuring the root domain (yourshortdomain.link), enter@or leave blank (the exact convention varies by provider —@is standard for root). - Value / Points to / IP Address: the IP address provided by Cuttly in the dashboard (visible when you added the domain in Step 2)
- TTL: leave the default value (typically 3600 or 1 hour). You may set a lower TTL (600 seconds) to speed up propagation during setup if your provider allows it
Save the A record. Most DNS providers show a confirmation message.
Critical warning: If the domain or subdomain currently hosts a website or other content, changing the DNS A record will make that content inaccessible. Cuttly explicitly does not recommend adding a domain on which a website or content is located. Only proceed with the A record change if the domain or subdomain is not currently serving any live content. If your website is at go.yourdomain.com (unusual but possible), use a different subdomain prefix.
Step 4: Configure the DNS TXT Record
Add a second DNS record — a TXT record — for domain ownership verification. Still in your DNS provider's management interface:
- Type: TXT
- Name / Host: same as the A record — the subdomain prefix (
go) or@for the root domain - Value / TXT Value / Content: the full verification string from Cuttly, starting with
cuttly-verification-site-followed by the unique string. Copy this exactly — any character error will cause verification to fail - TTL: leave default
Save the TXT record. At this point, both the A record and TXT record for your domain should be configured at your DNS provider.
Multiple TXT records: if your domain already has a TXT record (for email verification, Google Search Console, or other services), adding another TXT record for the same host is typically supported — most DNS providers allow multiple TXT records for the same name. Do not overwrite an existing TXT record; add a new one alongside it.
Step 5: Wait for DNS Propagation and Domain Verification
DNS changes take time to propagate across the global DNS network. The propagation window:
- Typically: 15 minutes to a few hours for most modern DNS providers
- Maximum: up to 24 hours in some configurations
- Factors that affect speed: your DNS provider's propagation speed, your TTL setting (lower TTL = faster propagation), and the specific DNS resolvers your network uses
During this waiting period, Cuttly periodically checks whether both DNS records are correctly configured and visible. When both records propagate and Cuttly successfully verifies them, the domain status in your Branded Domains section changes from in verification to accepted. Cuttly sends a confirmation email when the domain is approved.
If the domain disappears from the Branded Domains list, it has been rejected — this is Cuttly's mechanism for communicating rejection alongside the email notification. Check your DNS configuration (most common cause: wrong A record IP or TXT content with a typo) and add the domain again.
How to check propagation status independently: use an online DNS propagation checker (search "DNS propagation checker") to verify whether your A and TXT records are visible from different global locations. If the records are visible in the checker but the domain has not been verified in Cuttly after several hours, double-check that the TXT record content is exactly as provided by Cuttly (including leading and trailing characters).
Step 6: Set Up SSL for HTTPS
Every branded short link must be served over HTTPS. Browsers display security warnings for HTTP links — http://go.yourdomain.com/link — which directly undermine the trust that a branded short link is designed to build. SSL is not optional for production use.
Option A: Let's Encrypt SSL (Single Plan+, Automatic)
From the Single plan ($25/month), Cuttly automatically provisions and renews a Let's Encrypt SSL certificate for every verified branded domain. No action required on your part — after domain verification, SSL is active within minutes. This is the simplest and most reliable SSL option for Cuttly branded domains.
Configure it in Cuttly: Edit Account → Custom Domains → SSL Settings → select Let's Encrypt SSL → click Change. This is typically already selected by default on the Single plan when you add the domain.
Option B: External SSL via Cloudflare (Free Plan and Starter)
On the Free and Starter plans, manage SSL externally. Cloudflare is the standard approach — it provides free SSL for any domain in its CDN.
Setup: if your domain is managed by Cloudflare, enable SSL in Cloudflare's SSL/TLS settings (set mode to "Full" or "Flexible"). If your domain is not currently managed by Cloudflare, add it to a free Cloudflare account and configure the DNS records there rather than at your original registrar. Cloudflare handles both the DNS management and the SSL certificate.
In Cuttly: Edit Account → Custom Domains → SSL Settings → select My domain has SSL certificate — https:// → click Change. This tells Cuttly that HTTPS is available on the domain, enabling HTTPS short link generation.
Testing SSL
After configuring SSL, test by navigating to your branded domain in a browser: https://go.yourdomain.com. You should see a Cuttly-hosted page (the default index redirect page) without any SSL warnings. The padlock icon should appear in the browser's address bar. If you see a certificate error or "Not Secure" warning, the SSL configuration is not yet complete.
Step 7: Configure Root and 404 Redirects
After domain verification, two additional configurations improve the visitor experience for anyone who navigates to your branded domain directly rather than through a specific short link.
Root (Index) Redirect
The root URL of your branded domain — https://go.yourdomain.com without any alias — by default shows a Cuttly-hosted page. With a paid plan, you can redirect the root to any URL you specify. Sensible options: your organisation's main website, a dedicated link hub page on your website, or a Cuttly Link in Bio page. Configure in Cuttly: Edit Account → Custom Domains → click "redirect settings" for the relevant domain → enter the Root redirect URL → Save.
404 Redirect
The 404 redirect handles any requests to non-existent short links on your domain — someone typing https://go.yourdomain.com/nonexistent-alias. By default, this shows an error page. Configure a redirect to your homepage, a "link not found" page on your website, or the Cuttly dashboard. This matters particularly if your branded domain appears on printed materials over a long period — some of those links may eventually be deleted from Cuttly, and the 404 redirect determines what happens when they are accessed after deletion.
Step 8: Create Your First Branded Short Link
With the domain verified and SSL active, create your first branded short link. In the Cuttly dashboard, find the URL shortener input field. Paste your destination URL. Before clicking Shorten, click the domain selector dropdown that appears below or beside the URL input field. You will see your verified branded domain listed alongside the default cutt.ly domain. Select your branded domain.
Click Shorten. Cuttly creates the short link on your branded domain with an auto-generated alias. The result: https://go.yourdomain.com/aBcDeF — a functional branded short link on your domain.
Test immediately: click the short link in the dashboard to confirm it redirects to the correct destination. Confirm the URL in your browser shows your branded domain and HTTPS (the padlock icon). The short link is live and tracking every click.
Step 9: Set a Custom Alias
The auto-generated alias (aBcDeF) is functional but not readable or memorable. For any link that will be shared publicly, printed, or referenced in a professional context, set a custom alias.
When creating a new short link, look for the "Custom alias" or "Custom back-half" field — it appears in the link creation interface below the URL input. Enter your desired alias before clicking Shorten.
Alternatively, edit the alias of an existing link: find the link in your dashboard, click the edit (pencil) icon, and modify the alias. Note that changing the alias changes the short link URL — if you have already shared or printed the link, the old alias no longer works after the change. Only change aliases before distribution.
Alias design principles (from the branded short link guide):
- Lowercase, hyphens between words (not underscores):
spring-salenotspring_sale - Descriptive:
go.brand.com/spring-salenotgo.brand.com/x7Qz9m - Short enough to type: 2 to 15 characters for any link appearing in print
- Stable for permanent links: avoid date-specific aliases for long-lived links
- Consistent naming convention across your link library:
[campaign]-[channel]or[product]-[context]
Custom aliases are available from 3 per month on the free plan, 30 per month on Starter, and unlimited on Single and above.
Step 10: Add UTM Parameters
UTM parameters pass attribution data through to your website analytics platform (GA4). They are appended to the destination URL — not to the short link itself — and flow through the redirect to the destination page's analytics tracking.
In the Cuttly link creation or editing interface, find the UTM builder section (available on all plans). Fill in:
- utm_source: the platform or channel —
instagram,newsletter,sms,flyer - utm_medium: the medium type —
social,email,sms,print - utm_campaign: the campaign name —
spring-launch-2026,product-release-q3 - utm_content: optional, for distinguishing between multiple links in the same campaign —
header-cta,footer-link
Cuttly appends these parameters to the destination URL automatically. When a visitor clicks the short link, the UTM parameters are visible in the full URL at the destination page — and captured by GA4 as session attribution data. Cuttly's own link analytics tracks click-level data (device, location, time); GA4 with UTM tracks session-level data (pages visited, events triggered, conversions). Both layers together provide the full picture from click to conversion.
Step 11: Generate and Customise a QR Code
Every branded short link automatically generates a QR Code in Cuttly. The QR Code encodes the short link URL — every scan is tracked in the same analytics dashboard as link clicks. Click the QR Code icon next to any short link in your dashboard to open the QR Code editor.
Quality: set to H (High) for any QR Code that will be printed. H allows up to 30% of the code to be damaged while still scanning — essential for print resilience and required if adding a logo.
Dots style: available from the Single plan. Options: Square, Dots, Rounded, Extra Rounded, Classy, Classy Rounded. Square is the most universally reliable; Rounded or Classy for premium brand contexts.
Dots colour: set to your brand's primary dark colour. Ensure sufficient contrast against the background (minimum 4:1 ratio). Dark navy, forest green, deep burgundy all work well against white. Avoid mid-tones and pastels.
Logo overlay: upload your logo in the image field. Set Image size to 0.3 to 0.35 (30–35% of QR Code area). Set Image margin to 1 or 2. After adding the logo, scan the preview with your phone before downloading — confirm it scans correctly at the intended print size. If it fails, reduce Image size or simplify the logo.
Download format: always SVG for print production. SVG scales to any size without quality loss. Deliver the SVG to your designer or print service for placement at the correct size. Follow the sizing guidelines in the QR Code best practices guide — minimum 2.5 cm × 2.5 cm for materials held in hand, larger for wall displays and signage.
Troubleshooting: Common Setup Issues and Fixes
Domain Rejected or Not Verifying After 24 Hours
Symptom: domain disappears from the Brands Domains list (rejected) or shows "in verification" for more than 24 hours.
Most common cause (80%+ of cases): incorrect DNS A record — wrong IP address, typo, or the record was added to the wrong domain level (e.g., added to the root when the subdomain was intended, or vice versa).
Diagnosis: use an online DNS propagation checker. Search "DNS propagation checker" and test your domain. Verify: (1) the A record shows the correct Cuttly IP address, (2) the TXT record shows the full cuttly-verification-site-... string, (3) both records are for the correct host level (subdomain or root).
Fix: correct the DNS records at your provider, wait for propagation (up to a few hours), then add the domain again in Cuttly. Cuttly generates a new verification string each time a domain is added — use the new string for the TXT record.
Short Links Show as HTTP Instead of HTTPS
Symptom: short links use http:// rather than https://, or browsers show a security warning when clicking the short link.
Cause: SSL is not configured or not yet provisioned for the domain.
Fix (Single plan+): Edit Account → Custom Domains → SSL Settings → select Let's Encrypt SSL → click Change. If Let's Encrypt provisioning is still pending, wait 30 to 60 minutes and refresh. Let's Encrypt SSL typically provisions within minutes of domain verification but may take longer during high load periods.
Fix (Free/Starter plan): configure Cloudflare in front of your domain. In Cloudflare's SSL/TLS settings, set mode to "Full" or "Flexible." In Cuttly, Edit Account → SSL Settings → select "My domain has SSL certificate — https://" → Save.
Short Link Redirects to Wrong Destination
Symptom: clicking the short link takes you to a different page than the intended destination.
Cause: the destination URL was entered incorrectly when creating the short link, or the link has been edited after creation with an incorrect new destination.
Fix: in the dashboard, find the link, click the edit icon, and correct the destination URL. Test the updated link immediately by clicking it.
Custom Alias Already Taken
Symptom: attempting to create a short link with a specific alias fails with a message indicating the alias already exists.
Cause: the alias is already in use by another short link on the same branded domain in your account, or (for cutt.ly domain) by another user.
Fix: choose a different alias. For your branded domain, check your existing links for a conflict. For the cutt.ly domain, the conflict may be with a different user's link — switch to your branded domain where you have full alias namespace control.
DNS TXT Record Not Being Detected
Symptom: DNS propagation checker shows the A record is correct but the TXT record is not visible.
Cause: TXT record not saved, saved incorrectly, or not yet propagated.
Fix: return to your DNS provider and verify the TXT record is saved with the correct host level and the exact TXT content. Some providers put the TXT record into an "advanced" or "secondary" DNS section — check all available record locations. Re-save if in doubt. Wait an additional propagation window after re-saving.
Managing Multiple Branded Domains
From the Single plan, Cuttly supports up to 5 branded domains simultaneously. From the Team plan, 10 domains. Each domain goes through the same setup process independently — A record and TXT record per domain, SSL per domain.
Multiple domains are useful for: separate brands or product lines within the same organisation (go.brand-a.com and go.brand-b.com), separate short domains for different geographic markets, a dedicated print short domain for maximum link brevity alongside a longer subdomain for digital use, or separate domains for team and personal use within a shared Cuttly account.
When creating a short link, select the appropriate domain from the dropdown in the link creation interface. All links across all branded domains are visible in the same dashboard, searchable, and filterable by domain.
Important: if a branded domain is removed from Cuttly, all short links created on that domain are also deleted — including all their analytics history. Export links to CSV before removing any domain. This is a permanent, unrecoverable action.
What Comes After Setup: Naming Conventions and Link Organisation
A branded short link setup is operational, but its value compounds with consistent use. Two practices that scale well as the link library grows:
Alias naming convention: establish a consistent format before creating your first ten links. A common convention for marketing teams: [campaign-name]-[channel]. For example: spring-2026-email, spring-2026-instagram, spring-2026-sms. This makes the dashboard readable and per-channel analytics comparison obvious. Inconsistent aliases — a mix of random strings, date formats, and one-word descriptions — become unmanageable at scale.
Tags: apply a tag to every short link at creation time, reflecting the campaign, product, or channel category. campaign-spring-2026, product-widget-x, channel-instagram. Tags are searchable and filterable in the dashboard. From the Team plan, Cuttly Campaigns uses tags to aggregate analytics across all links sharing a campaign tag — one click shows the total click volume for the entire campaign across all channels without manual aggregation.
With naming conventions and tags in place from the start, the link library scales cleanly — 10 links, 100 links, 1,000 links, all findable, filterable, and analytically comparable.
Your Branded Short Link Setup Checklist
- ☐ Domain decision made — subdomain, dedicated short domain, or apex
- ☐ Domain registered (if new) — or subdomain identified from existing domain
- ☐ Cuttly account created at cutt.ly/register
- ☐ Domain added in Cuttly — DNS A record IP and TXT verification string copied
- ☐ DNS A record configured at domain provider — correct IP, correct host level
- ☐ DNS TXT record configured — exact cuttly-verification-site-... string, correct host level
- ☐ DNS propagation confirmed — via propagation checker tool
- ☐ Domain status "accepted" in Cuttly Branded Domains
- ☐ SSL configured — Let's Encrypt (Single+) or external SSL (Free/Starter)
- ☐ SSL tested — https:// confirmed working, browser shows padlock
- ☐ Root and 404 redirects configured (paid plans)
- ☐ First branded short link created with custom alias
- ☐ UTM parameters added for GA4 attribution
- ☐ Short link tested — correct destination, HTTPS, QR Code scans
- ☐ QR Code downloaded in SVG for print use
- ☐ Alias naming convention documented for team consistency
The setup is complete. Your branded short link infrastructure is now operational: a verified domain on your own brand, SSL active, links tracked per click, QR Codes generating SVG files for professional print. Every short link you create from this point carries your brand's identity in every context where it appears — email, SMS, social media, print, QR Code. And every click generates an analytics event that, accumulated over weeks and months, builds the channel attribution picture that turns marketing intuition into marketing data. The setup took under 30 minutes. The compound value builds continuously from here.
Frequently Asked Questions
How long does it take to set up a branded short link?
15 to 30 minutes of active work: creating an account (2 min), adding the domain and copying DNS values (5 min), configuring DNS records at your provider (5–10 min). DNS propagation and Cuttly verification takes 15 minutes to a few hours (up to 24 hours maximum). Once verified, creating the first short link takes under 5 minutes.
Do I need to buy a new domain?
No. Use a subdomain of a domain you already own — go.yourdomain.com — without affecting your website. Only register a dedicated short domain if you want maximum link brevity ($10–$20/year). Never point your main website domain to Cuttly — use a subdomain.
What DNS records do I need?
Two records: an A record (pointing the domain to Cuttly's IP address) and a TXT record (containing the verification string starting with "cuttly-verification-site-"). No CNAME required. Both are configured at your domain registrar or DNS provider, not in Cuttly.
Why is my domain still showing "in verification"?
DNS propagation takes up to 24 hours. If still unverified after 24 hours: verify the A record IP matches exactly what Cuttly provided, verify the TXT content is exactly as provided (no typos), confirm both records are saved at the correct host level. Most verification failures are caused by a misconfigured A record.
Do I need to set up SSL separately?
On the Single plan ($25/month)+: No — Let's Encrypt SSL is automatic after domain verification. On Free/Starter: yes — use Cloudflare's free SSL or another external SSL provider. In Cuttly, configure SSL settings in Edit Account → Custom Domains → SSL Settings.
- Tools
- URL Shortener →
- Branded Domains →
- QR Code Generator →
- Link Analytics →
- Related Guides
- What Is a Branded Short Link? →
- Branded Short Link Setup Guide 2026 →
- Branded Short Links Complete Guide →
- UTM Parameters Setup Guide →
- QR Code Best Practices 2026 →
- Link Tracking 101 →
- Dynamic vs Static QR Codes →
- Support Articles
- How to Add a Custom Domain →
- How to Set Up SSL →
- Start Here
- Create Free Account
- Plans & Pricing
URL Shortener
Cuttly simplifies link management by offering a user-friendly URL shortener that includes branded short links. Boost your brand’s growth with short, memorable, and engaging links, while seamlessly managing and tracking your links using Cuttly's versatile platform. Generate branded short links, create customizable QR codes, build link-in-bio pages, and run interactive surveys—all in one place.
Cuttly - Consistently Rated
Among Top URL Shorteners
Cuttly isn’t just another URL shortener. Our platform is trusted and recognized by top industry players like G2 and SaaSworthy. We're proud to be consistently rated as a High Performer in URL Shortening and Link Management, ensuring that our users get reliable, innovative, and high-performing tools.


